OK we installed the new Seaward F600 hot water heater. Simple but not so. Some parts are not installed yet.
December 2012 - Marina Kona Kai Shelter Island San Diego, CA
Of course prepping the area was the first job. Moving all the cushions and Debbie put brown paper over some areas.
December 2012 - Marina Kona Kai Shelter Island San Diego, CA
Of course prepping the area was the first job. Moving all the cushions and Debbie put brown paper over some areas.
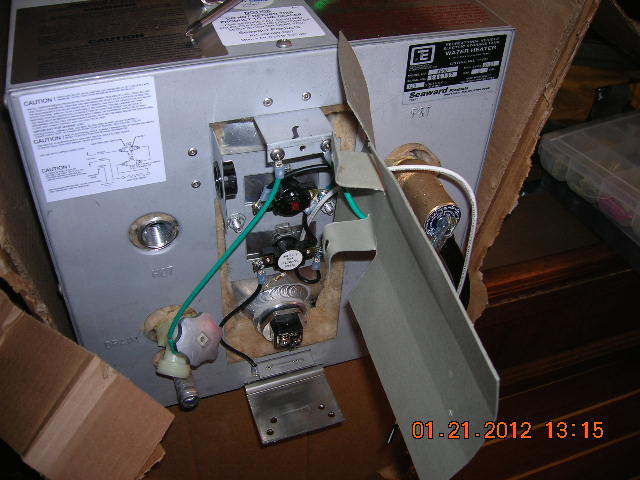
We first unboxed the Seaward F600 hot water heater or at least the front of it and took a look at what we would need
for fittings. We decided we needed two bronze elbows and a couple of 2" pipes and some 1/2" hose barbs.
Then we tried to remove the heating element so we could install our 12v-120v element.
No doing, there is no way to get a wrench on it. We were thinking that maybe we needed to remove the case to get at the heater unit. Lots of time and work. We decide to call for help. We called the site we bought the element from svhotwire.com for help.
102 West Fulton Street
Tarpon Springs, FL 34689
Phone: 727-943-0424
Cell 727-638-7417
hotwiregam@aol.com
We got help. The owner was up on his roof working or just came down but took the time to tell us we needed a special socket wrench. (Now why do people not include this information in the description.) There was no mention of this on the web site. There was no mention of this in the instructions, or wait, there were no instructions with the element. There was no mention of this from a fellow Freeport owner we went and visited and who had done the same installation. That is one big reason we shop at certain stores. If we can find a store that the counter help is knowledgeable or will say "you could really do with getting these items also as you will need them" then that is where we go. You know it saves lots of trips and re-scheduling of projects etc. That little extra that goes a long way. OK done with that rant now back to the install.
We found the socket at Home Depot in the, where else, water heater element section. Cost was little and we were on our way back to the boat. We had first tried ACE Hardware but with no luck. Then called Tool Depot which did not know what we were talking about.

More than that but you get the idea
Next we stopped at ME and picked up some fittings and extras in case our sizing was wrong. Yep that can happen😊 Also got some pipe goop.

New heater element socket wrench, screw driver turns it

We then removed the heating element with our new fancy socket wrench and installed the new one.
The old new element is sitting on top of the water heater as we are installing the new 12v\120v element.

12V\120V element.

That was easy enough

We had to add the hose barbs after because the elbows would not spin past the heater valves with them in. This was a dry fit.

Dry fit.

Debbie put the pipe goop on.

The hose barb was just to make the mess easier to hold.

Then we tightend them up. At times Debbie held one pipe wrench on the settee and we used it as a bench vice and I had the other wrench and tightened them that way.


Now doing the real deal.


OK all done with this stuff!.


Now to remove the old water heater.
You can see the strap hanging off the bulkhead. This is where the water heater was originality sitting. We moved it to port as there was plenty of room to do so. This opened up the area for our Mermaid Marine Air 12,000 BTU AC\heat unit for us. The unit is too high to fitanywheree else in the area aft of the stateroom. We wanted to replace this hot water heater before proceeding with the Mermaid Marine Air AC\Heat install.


Snipping wires.

Out!


On the way.

Out!

Before we put in the water heater we made some adjustments to the holding tank pump out hose when we had the extra room.


All our hoses come out of the top of the holding tank to minimize any leaking.
This is the one to the pump out. It is now just a little bit long and will be shortened when we re-bed the deck fitting. It is at a good flow now and secured to the bulkhead nicely.

Up it goes. Now to put the wiring back etc.

Now we are dry fitting the plumbing.

In goes the new one.


Checking it does not rub on hull and there is some Freeport wiring going by here.

Yikes, a plumbing roller coaster😜

We changed out some larger hoses and replaced a plastic "T" with a bronze "T".

It works, we have hot water!
This took a lot of our time so we deferred some other things for another day or night after work.

Now what?
Clean up the plumbing.
- First put in an elbow at the gray Freeport plumbing water line to the new water hose.
- Replace water hose from water pump to new elbow.
- Cut to fit water hoses to water heater
- Secure all the hoses
- Later we will flip water pump upside down and re-plumb and rewire it.
- Wire it to the heater
- Wire it to the 15 AMP breaker at the Nav Staion
This wire we will run through the engine compartment as 30' max is the length unless we go up in wire.
Going through the engine compartment can cause a 20% drop in AMPs from the heat. This will not matter because if the engine is running the engine will be heating the water. Plus this is a dump load any way.
- Run it to the water heater through the engine compartment
- Wire it to the solar controller dump load
- Wire it to the water heater element
- Plump it to the hot water heater
- Add valves?
- Plumb it to the engine
- Secure engine filler cap
- That means adding a bronze T in the water line.
- Running the 1/2 water line to the galley
So not quite done yet but this project is started and now the easy part is the rest.
This also will kick off other projects like:
Hot water at anchor with no genset!
The new water heater element heats the water just as hot as the old one. It just takes longer but I do not see how this is an issue. You get to the boat you have hot water. Possibly if another person wants a shower right after the first person but we shower together if possible and it is on our boat so who cares!!
This also will kick off other projects like:
- Moving wiring from deck are by water heater
- Installing electrical box for AC\heat 12,000 BTU unit
- Installing 12,000 BTU unit for the aft section of the boat.
- Then all the other supporting equipment.
Hot water at anchor with no genset!
The new water heater element heats the water just as hot as the old one. It just takes longer but I do not see how this is an issue. You get to the boat you have hot water. Possibly if another person wants a shower right after the first person but we shower together if possible and it is on our boat so who cares!!
OK, that was very detailed! Installing water heaters on a boat must be difficult for some first-timers. I bet this wasn’t your first time to do this, was it? I hope you were able to finish everything, including testing it, before you took the shower.
ReplyDelete