June 2011 - At Marina Cortez Harbor Island, San Diego, CA
 Dave from s\v
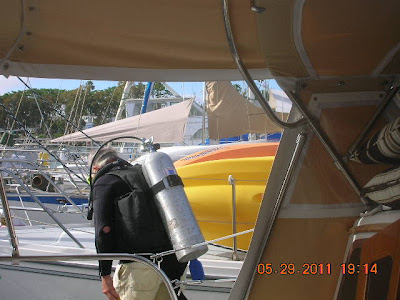
Islena our dock mate came by, he is a diver. He asked if we were ready and yes was the answer.
Dave from s\v
Islena our dock mate came by, he is a diver. He asked if we were ready and yes was the answer.
 Dave suited up and also gave me another drill so one drill was for the pilot hole and the other corded one for the hole saw.

 I noticed that the outside of the through hull fitting had a couple protruding ribs. This meant that a wood plug would not seal it up. We have one of the new rubber type and it works good there.


Just put M Marine Adhesive Sealant 5200 up the threads a bit.
The scenario was going to go like this, yes going to go.
1. I drill the pilot whole.
2. Dave locates it and knocks on the hull.
3. I pull out the drill bit and he puts a plunger over the whole.
4. I drill the hole for the through hull fitting.
5. He can tell when the saw comers through and then slips in the through hull fitting.
6. I put on the backing plate and then screw on the retaining nut.
7. Then screw on the valve.
Hinze came by and started joking around.

Dave jumped into the water.
We wait for him to swim around to the boat.

Where the through hull will go.

You can see where I marked the hull, bottom right.
Hinze thinks the whole is not below the water line. Dam, I get worried. Did I measure wrong yet one more time! Naaa
I go down and drill the pilot hole, some water comes into the boat Ya!
Dave has a hard time locating it. Finally a couple knocks on the hull.
I pull out the drill with the drill bit for the pilot whole and water shoots into the boat. That’s good cause it is located right.
I drill the hole with the hole saw and the whole saw shoots out to the water as the drill lunges forward. Water comes in and I pull out the hole saw. I see a big stream of clear blue water coming into the boat on a big loop. Looks like the water in the tropics. The light on the outside of the boat is shinning into the water and into the baot. I am memerized! Ooops there is no plunger?? OK I put my hand over the whole to stop the water. Probibly a gallon of water came into the boat, no big deal. I am streached out holding my hand there and am not very comfortable. Dave is having a hrd time locating the whole. Hinze is busy communicating between us.
Dave finds the whole and slips in the through hull fitting.
I put on the wood backing plate.
Then I put on the nut and tighten it down but the through hull fitting keeps spinning.
Hinze says to put on the valve so Dave can come up.
OK good idea because when I put on the valve the handle hits the ply wood salon brace under the seat. This enables me to tighten down the nut as the valve stops the through hull fitting (THF) to stop spinning. I get the nut tight.
There is a leak, dam!
Hinze complained we did not get enough 3M Marine Adhesive Sealant 5200 on the through hull fitting and I did not drilled the hole straight. Right, and it comes to be right again.

Hinze takes over my end, oh OK.
Because I got a small tube of 3M Marine Adhesive Sealant 5200 we do not have enough to put what’s need on the THF. I cheeped out😡.
I call Debbie who is running some errands and as her to run by West Marine which is still open and pick us up some 3M Marine Adhesive Sealant 5200 and Dave said he would stay in the water and wait. We then went about thinking who on the dock might have some. Hinze jumps and said wait! He came back from his boat with a almost full small tube. Ya.
Then I call Debbie and canceled.
Hinze backs off the THF nut and pushes out the THF and Dave slaps on lots of 3M Marine Adhesive Sealant 5200. It needs to get high up on the threads so when you tighten down the retaining nut it squishes between the nut and the outer THF. This works and wala no leaks. Hinze tightens down the nut holding the THF with a pair of channel locks and using a pipe wrench on the retaining nut. Kind of hard to get at and some foul language and grunts and stuff but all done. The then we take off the handle on the through hull valve and tighten it down, same thing, grunts bad language and groans and it is tight as hell.


The THF is installed and does not leak!
Dam it leaks - the valve leaks. We did not use any Teflon tape on the threads. Seems we should have. It is like welded on tight now though. It leaks very little. A drop here and there so we decide to let it sit until the 3M Marine Adhesive Sealant 5200 cures at least. It may seat after a couple days and I not then we will try removing the valve and adding Teflon tape and re-installing the valve.
It is done and actually with little water into the boat. When Dave was suiting up he said that a lot of time he did not use a plunge and little water came into the boat. He was right. This was not a big deal as a safety issue. It was a pain in the ass as things go and especially because there seems never to be and easily accessible place to put a THF in a boat which sits below the water line.


 Dave said some 3M Marine Adhesive Sealant 5200 got smeared on the hull the second time around. This means when we heal over it will not look yachty. Guess that boat (the yacht one) will never sail?
That is the plan any way but as you see about plans.


 The hull is thinner than I expected. When drill the hole I tried to get it straight through but that is easier said. It is not a easy place to get at and certainly not a straight shot. The hull is curved and the angle of the drill is hard to determine. I suppose it could be done but it may require more experience than I have. I do not see it as a tolerance that is going to wreck the installation. As you can see I drilled it off to a slight angle and the whole THF set into place and sealed up just fine. At least this time 😀


All the other white hoses are coming out of that area. They are for the pump out deck fitting and the original macerator. We re-built the original macerator (Jacobs) but it will not prime. I gave up on it and got two bellows type TW Holding Tank Discharge Pump(macerators) at the Chula Vista Marine Swap Meet. Both Dometic VacuFlush types only one is a little older than the other. Got one for back up. We will use one of these. We will also have a separate hose for the macerator. This way you open the THF valve and turn on the macerator. No extra valve to go bad or turn. To pump out simply open the deck fitting and do it.


Because we are still messing with the salon upholstery it is not screw in so we just moved it out of the way.


All done - Debbie handing out some beers.

That is the plan any way but as you see about plans.

The hull we drilled out.

The hull we drilled out.


No comments:
Post a Comment