
The dark brown board is 3/4 marine plywood that supports the drawers.
After doing the engineering for a new Dometic VacuFlush TW Holding Tank Discharge Pump (macerator) system (deciding where everything should go and what macerator to use etc.) we were ready to start the project. The TW Holding Tank Discharge Pump install was broken down into three parts.
- First part was to install the new correct size through hull, valve and elbow.
- Then make a shelf with “L” brackets and macerator with it ready to install. The macerator is a Dometic bellows type of macerator. Same people who make our VacuFlush toilet. For the macerator we wanted it to be easily accessible in case of repairs. Well you need to remove the mattress but then it is easy to get at. Much better than any other location we could think of.
- And three is to install the pipe into the holding tank for extraction of the gray water (poo).
Here we explain the plumbing of the holding tank pipe and the installing of the TW Holding Tank Discharge Pump shelf and the dots getting connected.
The there is a drawer brace we had installed to support the back of the drawers that are under the bed. We did this when we installed the new holding tank. Those big drawers that hold a lot. We removed the one brace for the drawer that is over the holding tank.

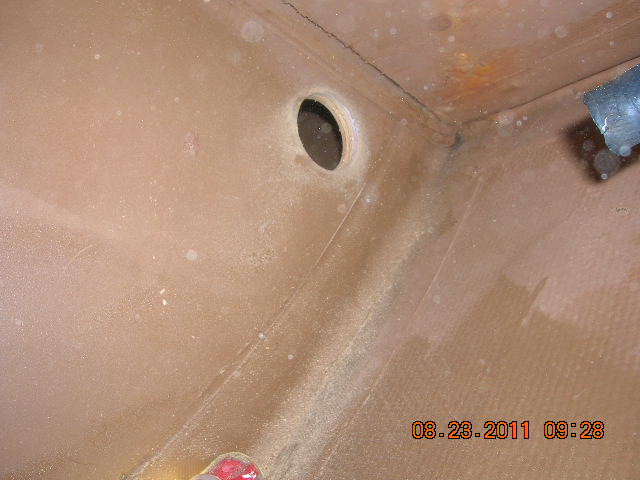
The small white hose is the holding tank vent and the large one is the pump out hose.
We also had to disconnect the wires and water pipe from the brace that it was supporting.
In the back ground you can see a whit hose and that has nothing to do with the holding tank. It is a vent we installed to the lower storage are under the step for the bead. Next to it is the dorad hose (painted brown) that goes to the bilge.

OK the brace is removed.
Next we need to remove the old or I will say new shower sump hose. We had replaced the shower sump hose when we replaced the HT. Since then we have redesigned the shower sump system as it is not a practical place for the through hull valve and the new shower sump pumps have come a long way.
So out with the black hose. Besides I have learned this black hose comes apart inside after a while messing with the pump.

Black hose can come out for foot room for the holding tank plumbing project
We are replacing it any way.

Our new hose will not need any elbows making it less likely to leak and better flow.

Next we want to remove the sound insulation we installed on the bulk head between the bed and the salon. We need to drill some holes and need to try not to hit anything like the hot water heater or pump out hose or vent hose or vent filter etc. on the salon side of the bulkhead.

With the sound insulation removed we can now drill our first pilot hole
Of course this takes a lot of climbing in and out of the HT area, checking for clearance and other objects. Lots of climbing and thinking which tires you out. As a boat owner we all know this too well and I cam mentally prepared. Still I did not get quite all we wanted to get done and made one mistake that you can see later.

Drilled the first pilot hole in upper right port hull side.
This will be a 3" hole and sever the new macerator hose to through hull and the shower sump hose to through hull exit\entry point. I left the drill bit in the pilot hole so I could did the climb arround and make sure it was good to go (did not hit anything). You know messure three times and then oops wrong spot! No it was good to go.
Now ewe are ready to drill the hole.
The wires around the HT are also being re-located. They will go to the T fuse block that we installed in the head for easy access.
Along with this current work while we are under the bead we are string a line from the fuse block in the head to the house battery bank so we can order the correct length of wire.

Along with this current work while we are under the bead we are string a line from the fuse block in the head to the house battery bank so we can order the correct length of wire.

That is the sting that is getting snaked through the boat to the batteries. It is tied off in the head at this time and that is as far as we got with it at this point.
With that 3” hole drilled we can turn to drilling the hole in the holding tank.
This is a scary thought. Do it wrong and then what? It needs to be far enough from the edge of the HT to allow for the rubber seal, about an inch. It needs to be far enough from the drawer so the hole can be straight up and down for the rubber seal to seal properly. There is not a lot of space to do this and there are the other hoses in the way.
Also the whole saw needs to be in the drill solid so after drilling the hole the saw does not fall out of the drill and into the tank. Oh no, that would be a bummer. Also the piece that is drilled out needs to stay in the hole saw. Should not be a problem but Murphy can have other ideas.
It is time to go for it and after much thought and preparation it turns out just fine.


It is time to go for it and after much thought and preparation it turns out just fine.

And there it is.

Made a mess.

poo!!
Now there is poo all over the whole saw and the space I am working in as It is coming off the drill. Time to clean up a bit. Also we need to clean the hole in the HT up from all the plastic burrs from drilling the hole. Using some sand paper to this inside and out there is more poo all over. Any way off to get the pipe ready (out on the dock) for installation into the tank.
This also takes a lot of thought especially since I lost the instruction that I probably would not have read anyway unless desperate which I kinda am because this is not a place to screw up.
This pipe needs to go to the bottom of the tank. It also needs to seal at the top. It needs to fit each place just right. So it is a piece by piece process. Cut a little and re-measure and then cut for the next part and re-measure and so forth. I actually got it right!

 The piece that came out of the hole I used as a spacer for the bottom measurement. Placing the PVC pipe on the cut out piece I could then start the measurement for the size of the pipe. It is easier for me to visualize than to strictly use numbers.


Parts that go to the PVC pipe.

Then it was the process of adding PVC parts and deducting from the PVC pipe.


Then I climbed out and started some clean up and to take a need break. As I climbed off the boat I noticed that the PVC primer was spilling onto my hand. The top was on tight but there was some around the rim of the little can. Dam. I thought I was lucky that it did not spill onto the teak grate. Then I thought what about the sole! Yep dam it dripped on the sole in about 6 places. I immediately put soap on the spots and started to scrub with a dish sponge with abrasive plastic on it. After an hour of scrubbing they all (the purple PVC primer) came off the deck and did not stain the teak. It did however take off the varnish from the sole. As it turned out all the spots are on hatches so that is a little help top re-varnish.

The bright spots are from the flash of the camera.

It is the dull spots that are PVC primer spots.
Not happy about this but what can I do but re-varnish when time allows. Not too long from now as we do want the teak to turn color in the spots.


(After close inspection we did see that these hoses are in fact Trident Oder Shield hoses, the color is just off between the two hoses, sorry Marine Exchange my fault)
Next it was time to mount the macerator. First we put the sound insulation back on the bulkhead and it will also act as a dampener for the marcator shelf. The being careful not to drill through to the water heater etc (making a bunch of trips to the salon) the six holes got drilled and the six screws were tight.

The shelf and the TW Holding Tank Discharge Pump are in place.
Now it is time to connect the dots.


We put the short hose onto the PVC HT pipe and then onto the macerator.
Next it was time to mount the macerator. First we put the sound insulation back on the bulkhead and it will also act as a dampener for the marcator shelf. The being careful not to drill through to the water heater etc (making a bunch of trips to the salon) the six holes got drilled and the six screws were tight.
The shelf and the macerator are in place.
Then it was a trip to Marine Exchange for more hose.
Got 8’ of 1 ½ inch odor shield (gray water) hose.
15’ of ¾ ID gray water hose for the shower sump.
A 10 AMP fuse for the macerator (pack of assorted fuses)
4’ of red and black 14 AWG wire to wire up the TW Holding Tank Discharge Pump.


On returning we installed the 8’ of macerator hose. We put a loop in over the through hull valve and ran it to the macerator. It was about 2 - 1/2 too long so we chopped the excess.
At the same time we ran the ¾ shower sump hose through the same 3” cut out hole that the macerator hose sits in and then down to the shower sump. This hose is so gray water sitting it does not smell and it does not kink easily. You cannot see the old shower water in the hose earthier which makes it nice.

The TW Holding Tank Discharge Pump was wired and the 10 AMP fuse we put on the salon side next to the HT breather filter for convenience. It is easy to get at. The main reason it will blow is if you fail to open the through hull valve before turning on the TW Holding Tank Discharge Pump. If it blows it is easy to get at and change.
Still need to clean up the wires a bit by securing them to the bulkhead and facing the fuse out.

Used the yellow line to measure for the macerator hose, and yes I was off by a couple feet. At least it was a couple feet to long not short!

The loop.
Once wired and plumbed I turned on the TW Holding Tank Discharge Pump(macerator) and was crossing everything. At this point I was real tired and not sure what to expect. We did got the bellows macerator at the Chula Vista Marine Swap Meet and although test the electric pump by hooking it to the batteries I was a crap shoot if it would actually pump or not. Would the PVC pipe be at the bottom and pull up gray water? We were just pumped out.
Would there be any leaks, not likely.
There was one place that was of question.

The elbow that sits on the through hull valve is bronze. It was a pain to get the 1 ½ hose on it. The first time I was not satisfied so I cut it back off and tried again. Used a heat gun and soap. Still it only went on say a couple inches. Enough for a hose clamp but not two hose clamps. The hose even got a little distorted with the heat gun by the elbow. Still not a likely leak though.
This we may revisit at a later date. I was too tired and the valve is in a tough place to get to. Turning it on or off is easy enough but getting a hose on it is another story.
The maceratror worked great it started pumping right off and gay water came out no problem and under water which is what we were wanting!
This has been a long project and the results are really good and it is DONE!!.
As I was explaining to Debbie (she did some macerating to see it in action) about the install I noticed that the hose from the HT to the deck pump out fitting was white. I bought this hose at ME and they have odor shield hose which we just bought from Marine Exchange for this job and it is gray in color. I looked at the hose and it is for portable water. That means it is not sanitation hose! Now I had explicitly asked for odor shield sanitation hose at ME. They screwed up my order and now that hose will need replacing. Not too big a deal as we can do his when we replace the hot water heater but still a redo that did not need to be done. Dam.
(After close inspection we did see that these hoses are in fact Trident Oder Shield hoses, the color is just off between the two hoses, sorry Marine Exchange my fault)
Next will be the shower sump or the fuse block in the head or??
The drawer support board and the board that holds the HT in place will need to put back another day as I ran out of gas at the end of the day. Some hose brackets will need to be put in place to hold the hoses firm and some chafe for the wires and hose going through the bulkhead. All easy stuff.
All in all I am pleased with the project.
I’ll post a video so you can hear a bellows TW Holding Tank Discharge Pump(macerator) pump in action. We did not add sound dampening under the macerator pup on the shelf as no one will be sleeping when we use the macerator.
No comments:
Post a Comment