Guess what this is - picker?

OK bet you can’t guess what this is?

No

No not that either

Told you you could not guess it


Well OK I’ll tell you what it is.
It is for picking up stuff off say the ground. We plan on getting one and using it to retrieve things from the bilge, like wrenches or SS screws or whatever else we drop in there, rags etc.
A magnet also works but not for all objects of course.


Went to United fasteners- picked up engine insulation screws - 2011

My Jeep Wrangler out front of United fasteners. They have some cool planes built from Pepsi and Budweiser cans.
Went to the fastener shop and picked up 50 of each, screws and washers.
Box of 50 -14 x 1 ½ SS PH
Box of 50 - ¼ x 1 ¼ SS Fender washers 

Lights arrived, Galley, Stateroom,Engine

01\01\2011 Docked in Marina Cortez in San Diego Harbor Island.
Got our new lights.

This one will go in the bottom food storage cabinet under the stairs.
We have one over the vanity in the head and it can switch from red to white LED's.
Got it from defender.com.

This one will be one of a few in the engine room. We need to test it out to see how bright and how it will fit first. We are also considering one for the cabinet under the bed, the one with the big door. It is dark even during daylight there. One of these may fit inside above the door out of the way. It would really light that are up. These 20” strips on dray 1/5 of an amp (LED’s) We would need to add a switch also.
Sea Master Waterproof White LED Strip Light 20" 12V SMT-STRIP50W
 Got it from jmsonline.net.


This is one of two and will go under the shelf over the bead. The other is on back order.
 Got it from defender.com

Engine room insulation and fasteners purchased - 2011

We decide upon 1” engine room insulation and we picked up three sheets at Marine Exchange . The sheets of insulation are in the back of my Jeep Wrangler.

Original bilge pump, testing rebuilding - 2011

This is when I tested it.
The original bilge pump (Jabsco 36600 Series Bilge Pump 8 gpm) - (Jabsco bilge pump Model 6600) we tested at the boat by running a couple wire to it to see what was with the motor as it was not working. It sparked, the wire connections but did not turn over.

Rule 2000 bilge pump upgrade, through hull and valve - 2011

2011 - Marina Cortez San Diego, CA

Picked up the new bilge pump through hole for the Rule 2000 bilge pump.

Fourth quote - Teak and Holly sole

January 2011 - At Marina Cortez, San Diego, CA
Fourth quote for the Teak and Holly sole came in.

Yacht Doctor (Randy Spicer 619-223-9190)
Vinyl - $6,500.00
Veneer - $5,750.00 unvarnished

Closing up gaps behind the nav station - 2011

The area behind the nav station is in need of some sealing up.
The cabinets under the stairs also need sealing up. Islander left gaps between the lazeretts and the inside of the boat.

Rot under foot pump

The rot area under the foot pump (foot pump is out until the rot project is complete) is going to come out. The wood is too far gone to just use Get.Rot on it.
To get out the rotted plywood we need to remove the lower part of the front foot pump teak enclosure.
This is all enclosed in teak and will need to come out. We are trying to remove as little as possible. Some has to come out so we can cut the rotted plywood out and replace it. Then remount the foot pump and then re-install the front of the cabinet.
This is getting stalled because of the re-power.
We did get the teak screw plugs drilled out so we can put some screws in and back out the teak plugs. There are plugs on the four corners of this piece of teak with the upside down U in it.


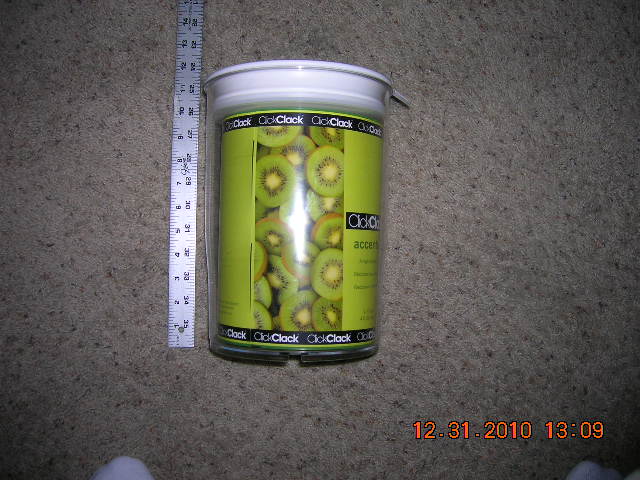
ClickClak containers

The ClickClac containers for the boat came in. A bit bigger than I thought but they will work out fine. We may check for other sizes. We have a couple smaller ones.
3.6 Quart
1-4/5 Quart
1-2/7 Quart


Tool bag

Work gave me the use of a tool bag. The one we have is getting way heavy so this one will relieve my back pain. The odds and ends need a place. Like the Allen head sets and the drill bit sets and the not so often used vise gripes etc.
At least that’s the plan for now.


Roy's Teak and Holly sole on s\v Breez'n Once More - 2011

January 2011 - At Marina Cortez, San Diego, CA
Here are some pics of a Islander Freeport 36 (Roy on s\v Breez'n Once More) owners Teak and Holly deck that is the same as what we are going to install. It is ½ inch plywood with a teak and holly veneer. His deck is over ten years old and looks great.

Original bilge pump

The bilge pump motor came off without any problems. The screws with nuts looked pretty bad but with a little oil they came off easy. That’s rare and well received :)  
The original bilge pump did not work when I tested it. The motor would not turn over. My guess it needs re-building or replacing or the whole pump needs replacing. I know it leak from when it did run. So we will take the motor to an electric shop for a re-build if and so what price etc.
 The pump needs new mounting feet and a re-build.
One of the nice things about this pump is it will suck like a vacuum so you can hunt and peck water around the bilge and get the last bit out.


Canister set

We got our fist of the set to be made up of ClickClack containers for a canister set. I think I went tooo big on this one the first. It may turn out full of something like popcorn :) or something.


Test insulation fasteners depth in wood - 2011

In preparation for doing the engine room insulation we did some testing with a couple of screws and a washer we bought. 

Sky Shade spaces fill 2011

Debbie put some white silicone around the Hatch Shade Screen in the state room.  This silicone we had left over from the hatch class install which we got from the manufacturer. It is white.

Teak grain matching

Got the replacement teak cover teak oiled. Now to drill the two holes, one for mounting the fan and one for the wires. Seeing as we have the last one all done this is easy, we just copied it.  Then on to maybe another coat of teak oil then wash with TSP and then start varnishing. We will need to put on about five coats to catch up with the bulkhead progress.  Not a problem because this is an at home project now in the garage.

Water, water but where from? found leak - 2011

Yay! Debbie found the water leak. We decided to do a fill-test as it seems like that is when we had so much water in the bilge, from the last time we put water in the boat.  And sure enough, the test showed where the water was coming from.  It was coming from the water tank breather type hose - just not the one attached to the top of the tank.

Engine room shaft nipple glassing

We put the resin in a black trash bag to warm it up before we could fiberglass the shaft fitting so we had an hour free. The temperature in the boat was probably in the low 60’s or so and the resin needs to be 67 or so to 87 or so (I forget the exact numbers) so out in the sun it went. In about an hour we opened it up and used our laser temperature gun to test the temperature by shooting the resin. It was 77 degrees, perfect.
 We mixed up four ounces of resin. I poured it into a mixing cup and Debbie put in 56 drops of hardener 14 to 1.

 I then wasted 3 1/2  ounces of it because we did not use it time. I think you have fifteen minutes to use it. Next time we will make less, a lot less. :)
 We will need to do this one more time to finish it off. Sand then do some more glassing. Then a final coat of paint.


Refer Insulation installation

Today we finally got the first piece of insulation into the refer box. Debbie and I glued it in after sanding and washing with Acetone.


 It was kind of a side note as we were there primarily to work on the engine room. But I realized we needed to put the resin in a black bag to warm it up before we could fiberglass the shaft fitting so we had an hour free.
After Debbie put down the glue (Liquid Nails) with the caulking gun I spread it around with a putty knife.
We had to pound the insulation down with a role of paper.  

The insulation was a really tight fit.

Then Debbie stood on the back side (stern section) as there is access through the port  lazerett. I stood on the inside part in the galley. Amazing hugh.

New 2" insulation on bottom
Space to be filled

We trimmed the second piece with a hack saw blade but decided to wait before installing it. There is a small ¼ space between the first piece and the wall of the refer so we will fill it with resin. Not a big deal but we decided to do the file before proceeding. The resin is at home, darn, back to the engine room.


Second piece waiting to be installed standing in refer