
Shade screen side - 2010

Engine removal
Monday is the big engine comes out day (the 29th of November). Debbie and I are going to take the boat to Loews Coronado for the Thanksgiving holiday. When we get back on Sunday we will ready it for the engine removal.
Debbie went to HD and got some bubble wrap and some carpet padding. We will line the companion way with it and the steps.
Remove all settee and salon cushions etc
Move the dodger forward and solar panel.
Hope for the best.
Refer insulation
This weekend we were supposed to go sailing, however the weather had a different idea about it. So Friday night after work Debbie and I went to the boat and batten down the hatches. Debbie made a template of the bottom of the refer for insulation. We got a winter rain storm and so we just vegged on Saturday. Sunday we went down to the garage for a while. We cut out the Dow Blue Board insulation using Debbie’s template.


This is a kinda mockup of what it would look like. Adding two 2” thick pieces to the bottom. Shown here is one as the other would simply be under it.
Then 2” inches to the back of the refer box as shown by the 2” scrap piece.
Then 2” on the side half way to the front of the box then 1” the rest of the way for ease of access.
The size we are looking at is 18 long and 11 1/2 wide
It seems as though it would be plenty big enough.
Or maybe:

Then 4” inches to the back of the refer box as shown by the two 2” scrap pieces and 4 " on the bottom.
The size we are looking at is 16 long and 11 1/2 wide
Shower grate varnishing coat #7 - 2010

I put another coat of varnish on the top of the shower grate (#7) and this one was the satin coat.
We are going to do satin but it could go back to gloss if the new teak and holy sole gets done in gloss as we suspect.
Propane locker modifications - 2011

Sunbrella hatch cover
We re-installed the hatch cover (sunbrella-white) over the bed hatch. It is way wrinkled because I threw it in the corner of the garage like we were never going to use it again.. It helps keep it cool. Also seeing as we do not have the Sky Shade back up yet it helps block the light. We still need to cover it to sleep in with a rug or some other object that is around the boat until we get the Sky Shade back up.

Sea of Cortez - videos - 2010
These videos have been ripped from sites that show Mexico sailing or place in Mexico.
Sea of Cortez
Link 2000 twisted pair wire no longer aviable through Xantrex, make our own - 2010
December 2010 - Marina Cortez San Diego, CA
OK found out that the twisted pair wires for connecting the Link 2000 to the shunt are no longer available. Searched the web and no one has them. Called Xantrex and they are not available but they told me how to make them.
So I will make them myself.
They are 18 or 16 gauge wire
So of course I will choose the bigger one – 16
Then it is five (5) twists per inch.
That’s it. Seems easy 😕
Xantrex Link 2000, manual, shunt, now need twisted pair wires - 2010

Xantrex Freedome 2000 Charger\Inverter.
It does not look like the twisted pair wires are with it. I think they were a separate buy. I did not know it at the time.
Other winch cleat installed
Debbie and I got the other winch cleat we installed. Got to like it all shiny and nice. Now to go sailing!
I could not stand it sitting in the sun so I threw a rag over it, the pain of it all. Set the calendar for a six month reminder to throw a couple coats of varnish on them again.
On this one I even tried to get the screw heads to line up, how anal is that? Pretty much huh.

Before- old cleat - old varnish

Before - old cleat - old varnish
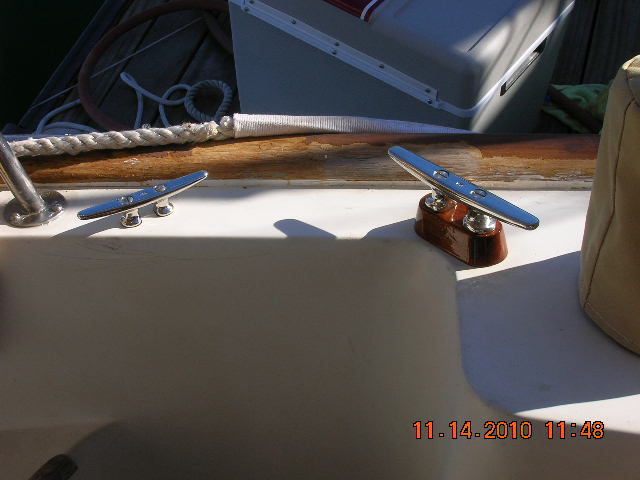
Now

Fan cover up
Yes we have finally moved out of the head on the varnishing. We have expanded! That is we needed some more places to varnish not that we are completely done in the head. There are still some places to be varnished. But it does feel good to move out and into the stateroom. We will get a lot of bang here for the effort because of the area we can cover. In the head it is bits and pieces and they take as long as a big area to do. So this is the place with the hole in the bulkhead that the previous owner had for the spiniker pole storage. We will have a fan here as I have said repeatedlyJ.

Washed with TSP several times


Sanded with 220 grit and washed with TSP
You can see the grain on the vanier is different than the patch piece. Nothing can be done to match that vanier. The patch piece of teak does match on three sides. All done you will not notice it and besides the vanier was against the other grain before we added the path of teak wood so it is really the same.


Mixing up the varnish
Finally doing this outside of the head!


Getting the first coat on
Head sink trim
We got the first coat of diluted varnish on the sink trim area. I broke the 110 plug teak cover by dropping it on the garage floor. Darn, had it already to varnish too. Not a big deal because it is surrounded by white in the head so it will not be mismatched teak when I buy a new one. We could even swap one from another area if need be but because it is where it is it does not matter.


Bed fluorescent light removed and teak plugged - varnish
2010 - San Diego, CA Marina Cortez
This is about as good as this area is going to get as far as the teak blending in. The holes are plugged and after a little more washing with TSP and some sanding with 220 grit it will be ready for varnishing. This weekend will get the first coat on I think. We were supposed to go sailing but we are getting a cold front and some rain so it looks like a good boat work weekend.
This is about as good as this area is going to get as far as the teak blending in. The holes are plugged and after a little more washing with TSP and some sanding with 220 grit it will be ready for varnishing. This weekend will get the first coat on I think. We were supposed to go sailing but we are getting a cold front and some rain so it looks like a good boat work weekend.
It may look better after we do what is above but no matter we will proceed! After al it does not look that off.
Debbie has it all taped up and ready to go!
Thought we would varnish the trim there also to get a little bang of like "oh that is going to look so good!!" so the front edge will get done as you see.


Refer build
After putting in more epoxy last night in the refer I decide that I was over doing it. I am just making this project too hard for myself. There is no need to put epoxy all around the separator panel for instance. It will have another layer of insulation (one inch added) and will get fiberglass laid over it. So I just need to make sure the box is sealed from the outside moisture etc. Meaning plug any holes and move on.
The holes are plugged. Well not quite, the drain needs epoxying up and I think I will leave the two holes for the previous connection to the cold plate there. We will use them for our evaporator plate.
So what’s next? Well cutting the insulation up to fit in the box, both sides. We think making templates from brown paper or cardboard may be the way to start. This will allow us to make a mockup of the refer and freezer. When we like it we will permanently put the insulation in with say 3M 5200. Then we will fiberglass over it all. The inside of the top still needs to be worked out also.

The epoxy we are using
Charger to batteries emergency cut off and new cables - 2010
2010 - Marina Cortez San Diego, CA


The positive cables arrived for the charger to the batteries. There will be an emergency cut off switch in between. 4/0 - 35” - 3/8 to 3/8 and 4/0 8’ - 3/8 to 3/8
Hole cover up
Went to the boat last knight and got some work done.
That is the best I can do to make the different woods match up. I think that after varnishing and the fan is put in place it will not be very noticeable. It shows now because I am concentrating on it.
The other options were to put a smaller board over the spinnaker hole. Then mount the fan and run a teak trim board to it from the teak trim with the wires hidden under the teak trim board to the fan. It would have looked real busy so this is for this problem the best solution we could come up with for what we wanted to do.
Got the second diluted coat of varnish on the hole cover area. Next will be a good sanding and then off to the races with eight more coats! In this pic the varnish is still wet.

Salon sole estimate - C.S. Ferguson Custom Woodworking
C.S. Ferguson Custom Woodworking called back and will talked a bit and he will call again after Thanksgiving. Our schedules to not match up until after the holiday. He will then come by to give an estimate on the sole installation and types.


Shower curtain hooks
The shower curtain hangers came. They use snaps to connect to the shower curtain. Not sure how they work.
Now to find out the rest of the story.


Satin on seat
Yep, we got the first coat of satin varnish on the shower seat. It may not look satin as it is still wet in this photo. As you can see the trim is taped because it is gloss. A couple more coats will be put on before it is done.
The varnish can was brand new but seemed partially empty. The varnish it’s self seemed thick. I suspect it was getting air in and evaporated some thinner. The problem with that theory is there was not “hockey puck” effect on top of the varnish as I would suspect if that were the case. Any way I used it as is because it does need to cover well. On the door I put two coats of satin and it still did not cover the gloss all that well. It will need a touch up sometime in the future. So we will see next time we are the boat (this Saturday).

New sole
We have called C.S. Ferguson Custom Woodworking on Scott Street for an estimateIt will be interesting to see the results.
on putting in different types of a sole in the salon and state room.

selected 4x8 sheets with the greatest contrast in the wood. We had it
installed by the yard at Baja Naval in Ensenada Mx. There are 5 hatches.
If I remember correctly, three sheets cost about $800 and $1000 for labor;
this was about 10 years ago. We put down the varnish ourselves and used oil
based Varathane crystal clear, you're right 10 coats. I would not use
Varathan today, they have changed their formula and it does not dry. "
on putting in different types of a sole in the salon and state room.

This is a pic of the one the Freeport owners who had a veneered plywood sole installed.
"First it's a teak and holly veneer with a half inch plywood backing. Weselected 4x8 sheets with the greatest contrast in the wood. We had it
installed by the yard at Baja Naval in Ensenada Mx. There are 5 hatches.
If I remember correctly, three sheets cost about $800 and $1000 for labor;
this was about 10 years ago. We put down the varnish ourselves and used oil
based Varathane crystal clear, you're right 10 coats. I would not use
Varathan today, they have changed their formula and it does not dry. "
Subscribe to:
Posts (Atom)